At my Idea Book launch in September, we created a Tis The Season Double Quad Fold Album. I posted a picture and have had several requests for directions. Here's a video showing how it all comes together.
Design Space
The greenery, bows and poinsettia (on belly band) were cut on my Cricut using images from the Seasons of Joy Collection. Click here to open the file in Design Space.
Measurements
Here are the measurements to create the album just in case you missed them in the video. The base of the album is made with 6 pieces of cardstock (I used black).
- 12" x 6" (2)
- 6" x 6" (2)
- 4" x 6" (1)
Assembly:
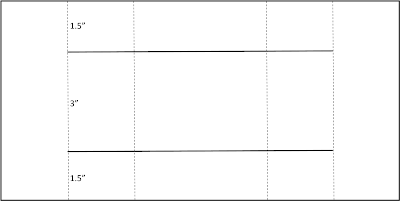
Score both 6" x 12" pieces at 2", 4" 8" and 10".
Then cut 1.5" from each of the long sides starting at the 2" score mark and ending at 10".
The top and bottom 1.5" sections are folded at all four of the score marks alternating "mountain" and "valley" folds. These two sections are folded the same. The center section is only folded at 4" and 8" and these will be the opposite direction as the outer pieces.
Turn one of these pieces 180 degrees and lay them end to end -- touching but not overlapping. Here's a sample made with White Cardstock so it is easier to see.
Cover the center section with the 4" x 6" piece of cardstock.
Score and fold both of the 6" x 6" pieces of cardstock 2" from one edge. Attach one of these to each end of the album, overlapping the 2" sections.
This completes the whole album base.
Decorate with pieces of coordinating paper and photos. Cut rectangles 1/4" smaller than each of the sections, so that base album creates a 1/8" mat.
Order before 12/31!
Note that the Tis the Season papers and the Seasons of Joy Cricut collection both retire on December 31. In fact almost everything in our current Holiday Expressions Idea Book will not be available starting January 1. Be sure to get your order in now if you have missed any of these favorites! Shop now>>
I hope you have enjoyed this tutorial. Please let me know if you have any questions. If you make a Double Quad Display Album, snap a picture and share a link in the comments below.
Happy Creating,
Rebecca


