In this hop, you will see projects featuring this exclusive and inspirational stamp set by many talented crafty ladies! Enjoy our blog hop.
If you have just hopped onto my blog, please start at the beginning at Lucy's blog - Love2Create. If you came from Love2Create then you are in the right place!
My project is this hand-stamped candle. I absolutely love all the lamps and lanterns on this stamp set and I am planning to use them in other projects. But for this project, I decided to start with a source of light (my candle) instead of stamping one and just stamp the lovely sentiment.
Stamping on a candle has be on my crafty bucket list for awhile and I found that it was not as hard as I had feared. Thanks to a couple great tutorials (Melissa Riker and Julie Staab), I was able to complete this project in about an hour.
The first thing you need (obviously) is a candle. You will also need tissue paper, wax paper, a craft heater, stamps and ink pad.
Ideally, your tissue paper will match your candle, but I did not have any that matched the soft yellow of this candle. So I made my own by inking a piece of white tissue paper with Buttercup ink. I started out sponging, but that was too slow so I got inky and just pressed the tissue into the ink pad. Then let it dry for a few minutes.
Although this tutorial is called stamping on a candle, that is not actually what I did. Instead I stamped on the tissue paper which I later adhered to the candle. I used Black ink and once it had dried, I trimmed around the sentiment.
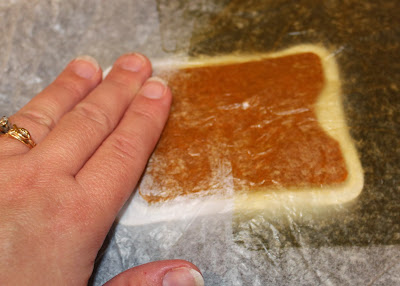
Next, I laid the stamped image on the candle and cover with wax paper.
Then I heated it with a craft heat gun until the wax paper turned shiny due to the wax melting. You want to make sure the wax on the underside of the sheet and the surface of the candle melts, so heat it just a few seconds after you see it change.
Next, I gently rubbed over the wax paper pressing the tissue into the melted wax of the candle. Slowly, I lifted off the wax paper. The first time I lifted it, one corner of the tissue paper stuck to the wax paper instead of the candle, so I just set it back down, heated and rubbed some more.
When I removed the wax paper, there were a few rough spots on the candle where the layers of wax had separated. To fix this, I heated those areas a little more and smoothed the wax by rubbing with the wax paper.
I finished off the candle with a little Huntington paper (cut with the Scalloped Border punch), Bronze Shimmer Trim and Brown Sparkles.
Your next stop on our Illuminate blog hop is 4 Hearts Scrapping with Jennifer.
Here is a complete lineup in case you get lost along the way:
- Lucy - Love2Create
- Rebecca - Show Me Scrapping (you are here!)
- Jennifer - 4 Hearts Scrapbooking
- Theo - Celebrate Crafts
- Traci Williams - Paper Crafting 101
Thanks for hopping along with us - we hope we were able to inspire you.
Have fun creating!


